
Owner – Portal Information
Welcome!
We are excited to welcome you to The Management Trust family of communities. As a member of one of our associations, you have 24/7 access to your account and community information, all available through your owner portal. The portal’s functionality and communication tools are designed to make it easy for you to interact with your management team and to access, in real time, the status of your account along with any pending requests, such as work orders or architectural modifications.
Click on the “+” next to each section below to view screenshots and instructions for navigating and using that page within the portal.
Once you have explored the sections below, use the ‘Log In’ button at the bottom of this page to log in the owner portal and give it a try!
LOGIN
Homeowners with a Registration Key
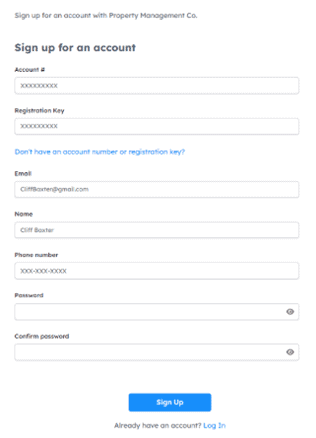
From the Pre-Login page, click “Log In” in the upper right-hand corner. From the Login page, click the Sign Up link.

Enter the following information and click the Sign Up button to complete:
- Account # and Registration Key: These are included in the association’s Welcome Letter.
- Email – Email associated with the login
- Name
- Phone number
- Password – Create your own unique password for this site
- Confirm password – Re-enter your personal unique password to confirm
Homeowners without a Registration Key
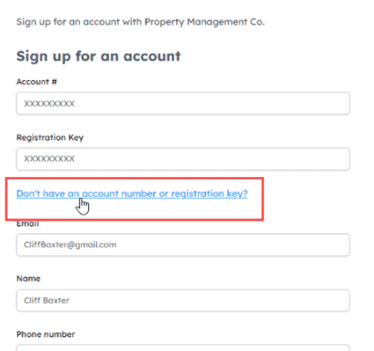
From the Login page, click the Sign Up link.
Click the Don’t have an account number or registration key? link.
Enter the following information and click the Request button to complete:
- Name
- Phone Number
- Property address
- Association Name
- Account # (if available)
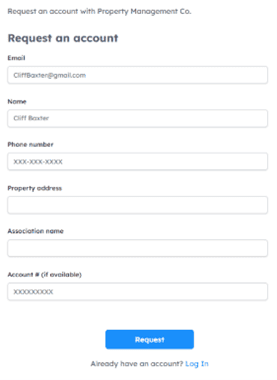
Requesting an account number and registration key is not an automated process, please allow enough time for your community management team to respond to your new account request. Expect a response in 2-4 business days.
Changing a Password
You can change your password in the Home portal by clicking your name in the top-right corner of the screen, select My Profile, and then click the Login Info tab on the Profile Settings page.
Enter the old password, set a new password, and click Update.

Forgot Password?
If you forgot your password, select the Forgot your password? link on the login screen to begin the process of getting a code that can be used to log in and create a new password.

Enter your Email Address and click Send Code.

After clicking Send Code, a message will appear stating, “Please check your email for further instructions”. A temporary code will be sent to your email address.
Note: Be cautious to only click the Send Code once. Selecting multiple times will cause the password to be reset multiple times and send multiple emails with different codes. If this occurs, the most recent email will be the one with the correct code.
For any other questions regarding your portal login, please contact your management team.
To access your Owners Home Portal go to https://my.managementtrust.com/ or select the Log In button.
HOME DASHBOARD
The Dashboard will be the landing page after logging into your Owner Home Portal. The Dashboard provides an overview of information including payments, recent requests, recent reservations (if applicable), and messages.

The following dashboard widgets will be available by default:
- Payments
- Requests
- Reservations – (if applicable, not all Associations use Amenity Reservations)
- Messages
Have Multiple Accounts?
The Account Selector is available on all Home pages and can be used to easily switch between multiple accounts.

Account Balance

- Multiple ledgers can be sorted through with the directional arrows.
- Click Manage Payments to open the Manage Account page, where you can manage your saved, recurring, and future one-time payments.
- The Credit Card/E-Check Button will be used to Make a Payment via credit card or one-time e-check.
- View Upcoming Charge information.
- Enroll or Unenroll in Auto-Draft to set up recurring ACH by selecting the provided link.
- View additional Account Details to see a transaction or ledger history for the displayed account.
Requests

- Submit a new request with the New Request button.
- Selecting an individual request or the View All Requests link will redirect to the Community Request > My Items page, where you can view additional request information.
Reservations

- View recent Amenity Reservations and their current status (if applicable).
- Create a new reservation with the New Reservation button.
- View the Community and Amenity Calendar by clicking View All.
Messages

- View your most recent Messages.
- View all messages on your account with the View All link.
MY PROFILE
To access the Profile Settings page, click My Profile from the dropdown menu under your name.

This page includes the following tabs:
- Contact Info tab (1): Shows the primary and other contact information for this homeowner. You can add a new address, email, or phone number from this screen.
- Login Info tab (2): Shows the current homeowner’s login email. Homeowners can change their password on this page.
- Account Preferences tab (3): Shows communication and homeowner directory preferences.

Edit or Update Contact Information
Contact Info Tab
This page allows you to manage your address, emails, and phone numbers:
Notes:
- By adding an address, email address or phone number to this page, you are authorizing communications regarding Association business to be delivered to the email, address, or phone number affiliated with the account. Some of this information may be private, such as account balance statements, account numbers, and collection notices.
- You can click the Edit icon (
 ) to change or delete information except for the Property Address, which is the legal property address set up by the management company.

- Primary Contact Info: This section shows the contact information that was marked as primary for the homeowner.
- Other Contact Info: Homeowners can have multiple pieces of contact information. Any contact information not marked as primary shows in this section.
Address
- Property Address:
- You cannot edit or delete this address. It is the legal property address set up by the management company/association and serves as the default mailing address for new accounts (if no other mailing address is set up).
- Always remain on the account even when you add other mailing addresses.
- Although you cannot delete the property address, you can remove the mailing address designation by first setting another address as the mailing address.
- Mailing Address:
- If your mailing address is the same as your property address, you will NOT need to create a separate mailing address.
- Users must always have at least one mailing address designated.
- You cannot delete or remove a primary mailing address without first setting another address as the primary mailing address.
- Any addresses marked as a “Mailing Address’ will receive mail from the Association and may increase costs. Ensure only necessary addresses are listed on this page.
- The login email automatically appears here from the user’s login credentials.
- You can add, edit, and delete email contacts and designate which email is the primary.
Phone Number
- You can add multiple phone numbers with custom labels (e.g. Cell, Home, Work).
- You can add, edit, and delete phone numbers and designate which phone number is the primary.
Add New Contact Information
- In the Contact Info tab, click Add Contact Info.
- Provide the following information:
-
- Contact Info Type: Email, Address or Phone Number. Depending on your selection, the screen will dynamically update with new fields.
- Provide the appropriate information for each field.
-

-
-
- Label: Enter the label for the contact information to be displayed above the contact detail.
-

-
-
-
- Make primary contact: Enable this toggle (if available) to make this the primary contact information.
- Mailing Address: Enable this toggle to designate this address as the address to use when mailing forms, letters, etc. You must always have a mailing address for physical mail.
- International Address: Enable this toggle to change the State and Zip code fields to Province and Postal Code and Country fields so you can enter an international address.
-
-
3. Click Add.
Change the Mailing Address
To change or delete the current mailing address, you must first designate another address as the mailing address.
- Edit an address listed under Other Contact Info.
- Enable the Mailing Address option.
- Confirm the change in the alert dialog. The address moves to the Primary Contact Info section. The previous mailing address moves to the Other Contact Info section (unless it’s the property address).
Login Info Tab
You can view your login email and change your password in this tab.

Change Your Password
- Ensure that your email is correct.
- Enter your Current Password.
- Enter your New Password.
- Re-enter the new password in Confirm New Password.
- Click Update once all fields are completed.
Account Preferences Tab
The tab shows the following:

Create Delivery Preferences
- General Communication Preferences: Select how you want to be notified of general communications.
- Choose from ‘Email’, ‘Paper’ or ‘Paper and Email’ delivery options.
- Preferred Email: Enter the email address to use for electronic communications.
- Preferred Address: Enter the physical address to use for electronic communications.
- Note: An electronic signature consent screen appears whenever you make a change to preferences.
- Send Payment Confirmation Email: Toggle on to receive a confirmation message to your primary billing email after making a successful payment.
- Receive Payment Reminders via Text: Toggle on if you want to receive payment reminder text messages and enter the phone number at which you want to receive them. This number is automatically added to the Other Contacts section with the label “cell”. Important: Do not edit this number or label, as it is connected to Express Pay and may disrupt the reminder text functionality. Any other phone number you add with a “cell” label will also receive text message reminders.
- Homeowner Directory Preferences: Enable the options to show different pieces of contact information in the Homeowner Directory. Note: The homeowner directory is disabled by default and only enabled by special request from the Board of Directors.
BILLING
Selecting Payments from the left navigation or Account Details from the Payments Dashboard Tool will take you to the Account Overview page, allowing you to view balances, make a payment, view payment history, and download statements for all your accounts.

For each of your account(s) displayed, you will have the option of setting up Auto Draft by selecting the ‘Enroll’ icon next to the ‘Auto Draft’ display, or making a Credit Card/E-Check payment (see ‘Make A Payment’ sections for more details). If you own multiple properties and would like to merge those accounts to view and manage them together, see section ‘Submit A Request – General Request’ for instructions.
MAKE A PAYMENT - AUTO DRAFT (ACH)
We are pleased to offer Automatic Draft (ACH), free of charge! Enrolling in ACH payments means that your regularly scheduled assessments will be automatically withdrawn from your designated bank account on the same day each billing period, between the 5th and 10th of the month. Check your portal for details regarding your region’s Auto Draft policies.
If you are enrolling in Auto Draft, please note that any enrollment after the 1st of the current month will not take effect until the following month. If you are enrolling in ACH payments after the 1st of the current month, please make a one-time payment or a standard check payment for the current assessment until the ACH is effective.
With Auto Draft, the draft amount will automatically change according to your Association’s yearly budget, so you won’t have to make any changes when your Assessment balance increases or decreases.
To enroll in Auto Draft, your account balance must be paid in full.
Select the Enroll link next to Auto-Draft.
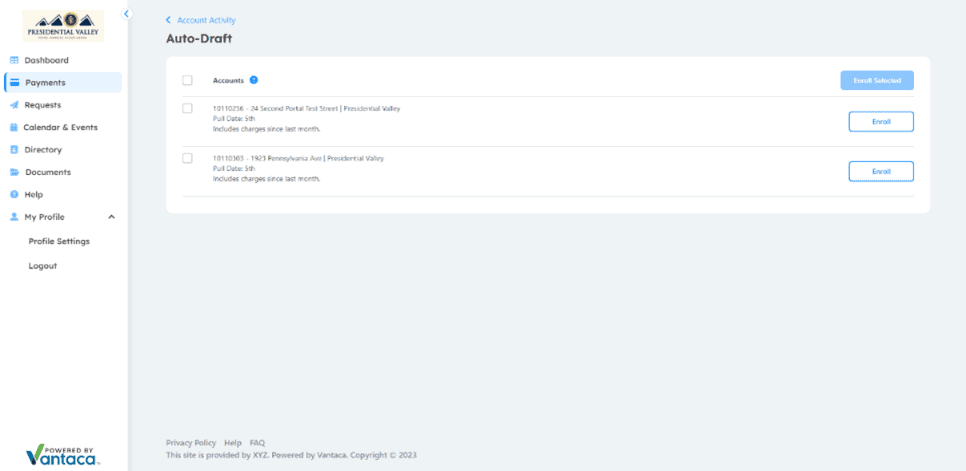
Enter the details for the account you wish to enroll:
- Start Month
- Account Type
- Bank Routing Number
- Bank Name
- Bank Account Number
Select Enroll to submit the ACH.
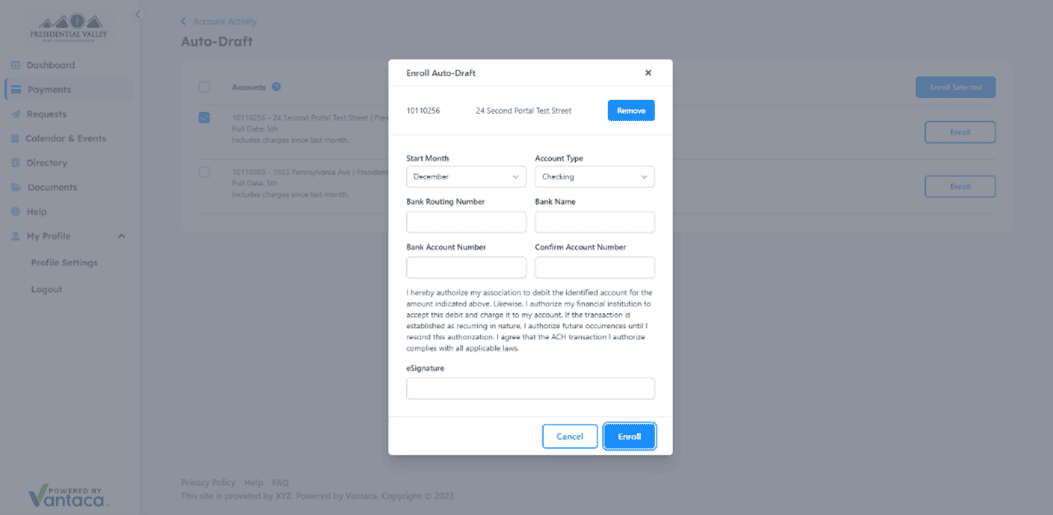
Any existing enrolled accounts will be listed on this page. Select the Remove button to un-enroll an account.
MAKE A PAYMENT – CREDIT CARD
One-time or recurring credit card or e-check payments can be set up using the ‘Credit Card/E-Check’ option. These services are provided by a third party, and transaction fees apply. Our Home portal provides for a seamless login to the credit card merchant, but all amounts and processing dates must be individually maintained by you, the member.
From the Dashboard’s Payment tile, select the ‘Credit Card/E-Check’ button on the desired account. If you have more than one account, you can cycle through the accounts via the arrows. You will be redirected to the third-party payment site to enter payment details and complete the transaction.

Select the Payments page from the navigation panel on the left, then click the ‘Credit Card/E-Check’ button on the desired account. You will be redirected to the third-party payment site to enter payment details and complete the transaction.

MY ITEMS
The Requests page is used to submit New Requests and view My Items.
View any open or recently closed items from the My Items page.

View additional information about individual items by selecting the item’s subject.

SUBMIT A REQUEST – GENERAL REQUEST
The Requests page is used to submit New Requests and view My Items.
There are three types of requests you can submit from here:
- General Requests – such as Work Order/Service Request, Billing Questions, General Questions
- ARC Request – to submit an Application to the Architectural Review Committee or Design Review Committee for modifications to your property
- Reservation Requests – this option will be displayed on some Associations that have amenity reservations enabled through the portal.
Provide information for the following fields in the Submit a Request section:
- Property (select the property the request is being submitted for, applicable when you own multiple properties managed by The Management Trust)
- Choose a Type of Request – the following are common types of requests
- Maintenance repair or Service Request to Association-maintained areas: Work Order
- Question about a statement or item billed on your account: Billing Question
- General question for the Community Management Team: General Question
- Subject
- Request Description
- Attachments (photos of Service Request Items, copies of correspondence you may be referencing, etc.)
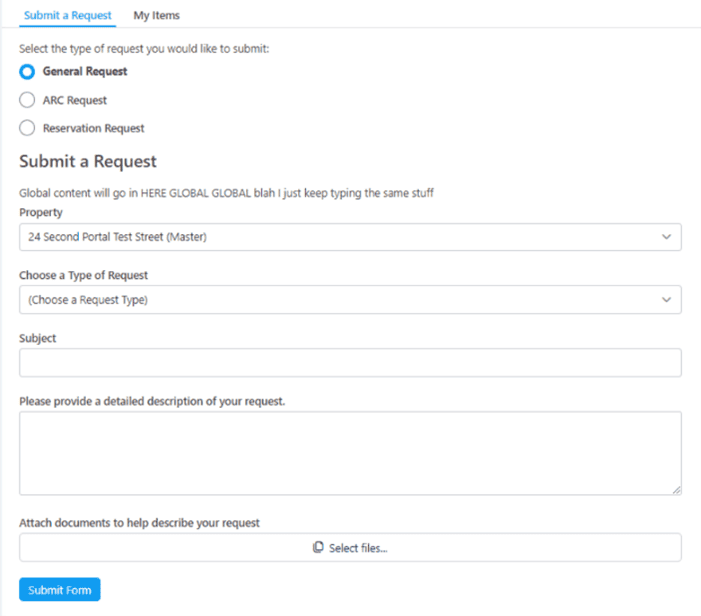
Click Submit to complete your request. After successfully submitting a request, your tentative request can be found in the Requests Dashboard Tool.
SUBMIT A REQUEST - ARC (Architectural Modification or Design Review Committee Application)
Depending on the region of your community, you may be able to submit an architectural modification (ARC/DRC) request on this page. Your community may provide forms and documents for you to review, download, and/or print so that you can complete, sign, and upload them with your request. Forms and instructions for what is required to file an application can be found on the ARC Request page.
The Requests page is used to submit New Requests and view My Items.
Select ARC Request.
Provide information for the following fields in the ARC Request section:
- Property (if you own multiple properties, select the one that you are applying for the modification on)
- Area of work
- Subject
- Work to be done – describe project
- Estimated Start and End Date
- Attachments & Documents – up to 25 MB (attach required forms and application for the community)
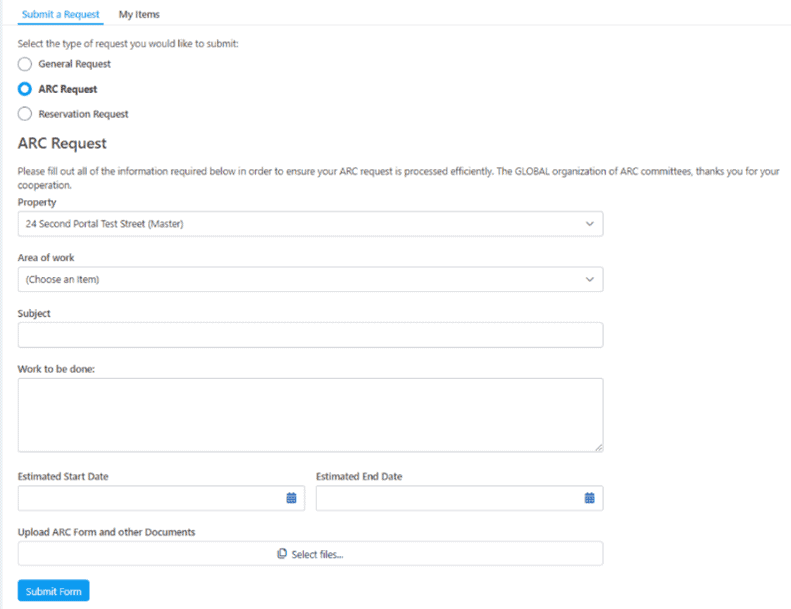
Click Submit to complete your request. After successfully submitting a request, your request can be viewed on the ‘Dashboard’ under ‘Requests.’
SUBMIT A REQUEST – AMENITY RESERVATION
Your community may offer the ability to reserve an association amenity, such as a clubhouse or picnic area, through this portal. This is not available for all Associations.
To submit a reservation request:
- On the dashboard, click New Request in the Requests section OR Click the Requests left-navigation option. The New Request page displays.
- Select Reservation Request.

- Provide the following information:
-
- Filter by Category: Select a category.
- Filter by Amenity: Select an amenity if more than one exists, or leave blank to view them all in the calendar. For example, in the previous image, there are two tennis courts to choose from. Each calendar column represents a different amenity. Choose a time in the calendar by selecting a start time and dragging down to your preferred end time. Your selection will be highlighted in blue. Note: The Category and Amenity filter will automatically be selected when performing this action.
- Property: Select your property.
- Event Date, Start Time and End Time: Automatically populated if you selected a time frame via the calendar; otherwise, you can enter or select the information manually.
(Optional) information you can add to the reservation request:
-
- Reminder Date:
- Event Name:
- Event Details: Enter information about the event.
- Attachments: Click Select files and attach any relevant files.
2. Click Submit. Your tentative request can now be found in the Requests Dashboard Tool and on the Calendars & Events page in the Amenity Calendars tab.
CALENDAR AND EVENTS – COMMUNITY CALENDAR
Calendar & Events can be used to access your association’s Community Calendar and Amenity Calendar.
The Community Calendar will default to the Month view, but you can also swap between Week, Day and Agenda.

CALENDAR AND EVENTS – AMENITY CALENDAR
For those Associations that use the portal for Amenity Reservations, your Amenity Reservations can be found in the homeowner portal via the Calendars & Events > Amenity Calendars tab.
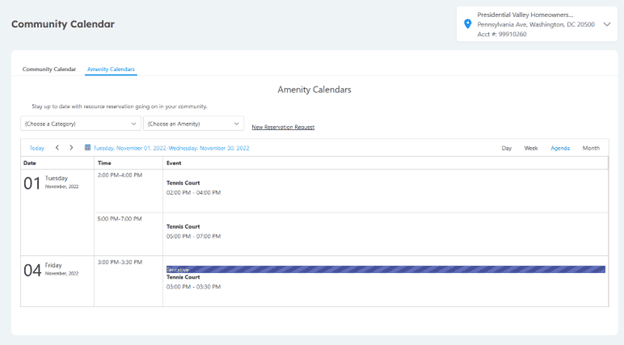
All of your tentative and/or confirmed Amenity Reservations will automatically display on the calendar.
The calendar can be filtered via the following:
- Amenity Category dropdown
- Amenity Type dropdown
- Selecting Day, Week, Agenda, or Month (this will set a view range for the calendar).
You can cycle through the calendar, based on the range selected (day, week, agenda, or month) via the arrows:

Selecting Today will automatically return the calendar to the current date.
DOCUMENTS
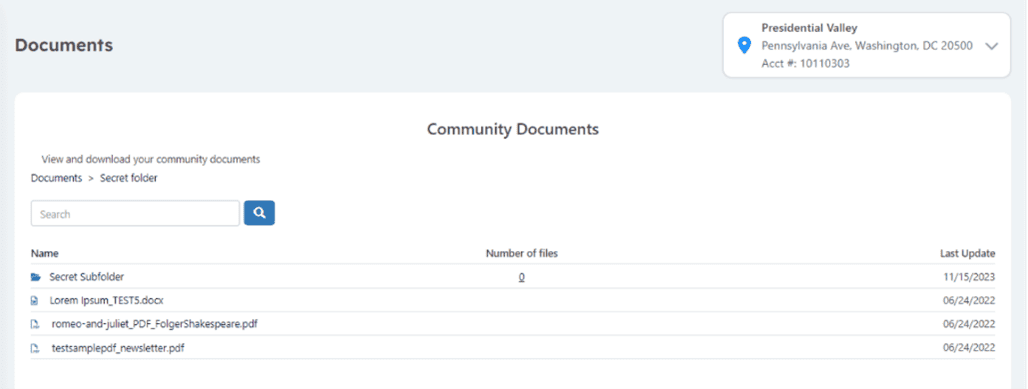
Select the Documents page from the navigation panel on the left.
In this page you can view association forms and documents, including but not limited to meeting minutes, newsletters, insurance disclosures, budgets, and financials.
These documents are stored within folders, some of which may be nested within other folders. Simply click on a folder to open it. You may also enter keywords in the Search field to find documents you are looking for.
You can view any accessible folders along with how many files they contain and when their contents were last updated.
The folder file path will always be displayed along the top of the page for your reference and easy navigation back through the path.
READY TO LOG IN?
Now that you have explored all the owner portal has to offer, we invite you to give it a try!
To access your Owners Portal go to https://my.managementtrust.com or select the ‘Log In’ button.
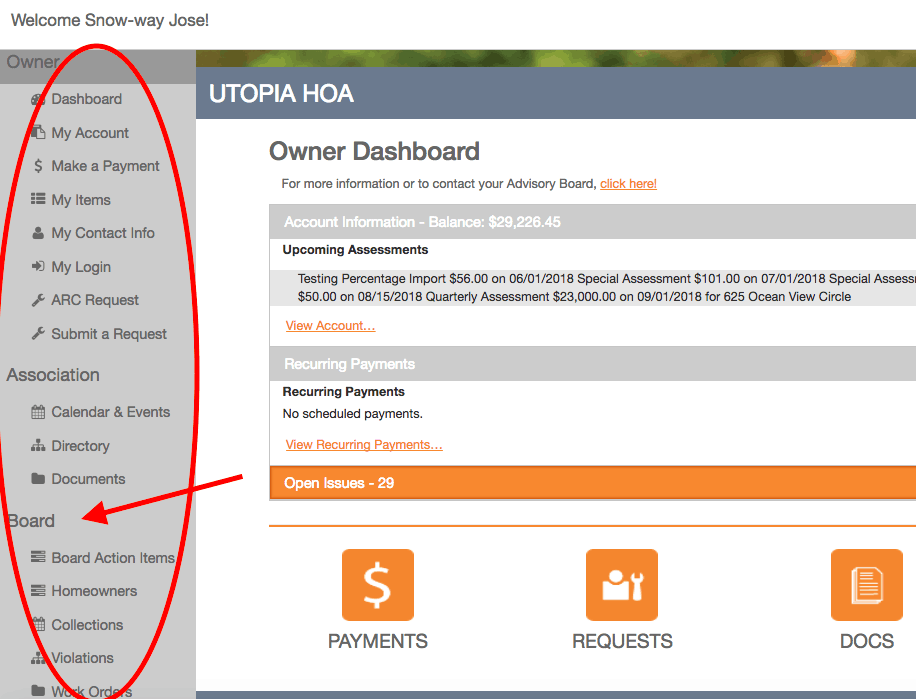
What can board members access?
As a board member, you will have access to additional information pertaining to the association. These additional options are listed below your own owner information.
How do I learn more?
We have a short video clip as well as information for each section below. Please feel free to reach out to us as well with any questions about your access and responsibilities as a member of the association’s board.
OVERVIEW VIDEO
BOARD ACTION ITEMS
In the Board Action Items page, you will see any Action Item or Association Task, that is currently assigned to you based on your role within the association. Based on the type of Action Item, you will be able to approve or decline or Msg (message) on these tasks from the orange menu box on the far right. The Action Item can always be viewed in more detail by clicking the drop down arrow on the left.

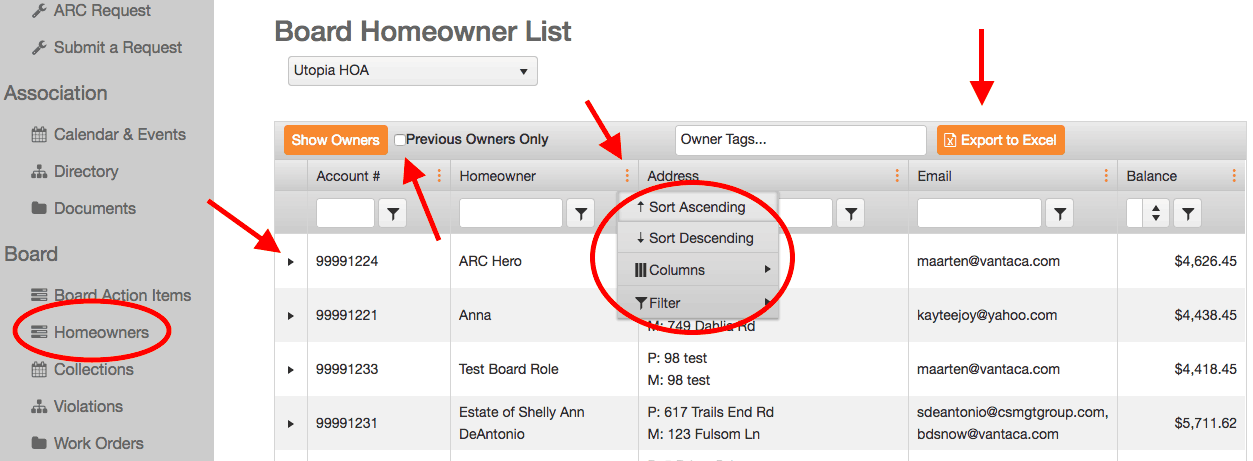
HOMEOWNERS
The Homeowners page is a searchable directory of all owners that can be easily exported to Excel for reporting or documenting by clicking on the Export to Excel button. The directory can be filtered by any column by clicking the 3 dots in the column header. You can also sort the columns, adjust search values, or add or remove columns. To see previous owners, check the Previous Owners Only box. To view an owners open Action Items, Charge Balances or Transaction History, click on the drop-down arrow next to a specific homeowner record. Click the Show Owners button again to refresh your Homeowners List.
COLLECTIONS, VIOLATIONS, WORK ORDERS
The Collections, Violations, and Work Orders pages show all open Action Items of that type, and can also be used to research previously closed Action Items of that type. Depending on the settings established by your management company, you may have access to one or all of these pages. Contact your management company for more information about your access to the different Board Portal sections.
INVOICES
This is for Board Members, who have been given the role of Board Invoice Approver, to approve invoices from the Owners Portal.
Within this system you can:
- Manage all the invoice tasks assigned to your role as the Association’s Board Invoice Approver through the Owner’s Portal;
- Approve or decline an invoice using the Board Action Items page;
- View messages, the GL code and previous invoices from a vendor.
When you click on this page, you will see all invoices assigned to your role. These are all the tasks or workflow action items that need your seal of approval – or denial in some cases.
By clicking the drop down arrow on any invoice it will allow you to see specific information such as any Messages, the General Ledger, or GL, that the invoice is coded to and any other previous invoices from that particular vendor.
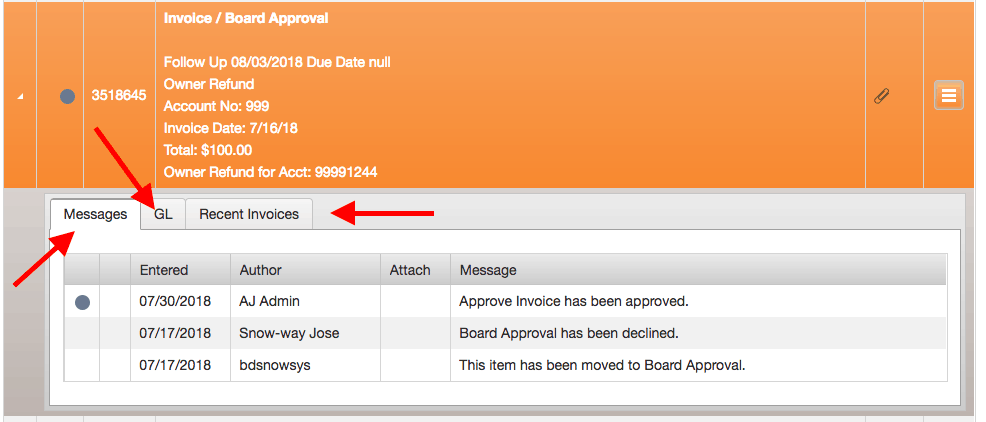
Clicking any paperclip icon will pull up an image of that invoice. By clicking the orange menu button you have options to either approve or decline this request or send a message.
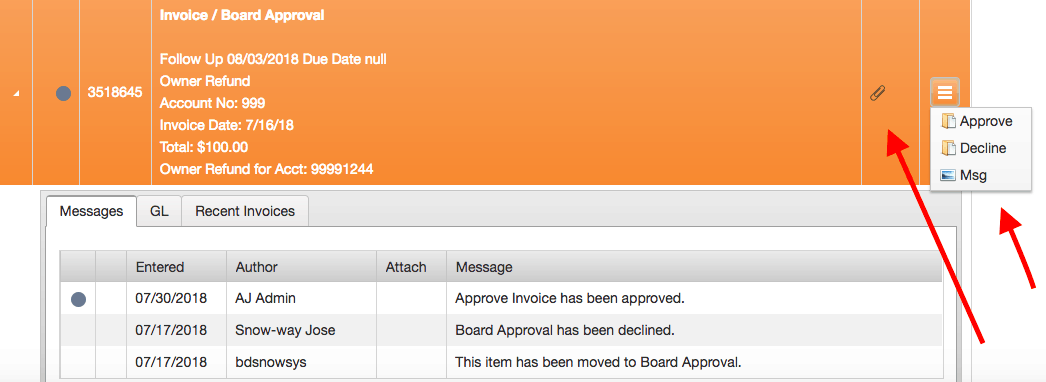
In summary, by logging into the Owners Portal, and with a few clicks, you will be able to take care of all the invoice tasks assigned to your role as the Association Board Invoice Approver. The Board Invoice Approver responsibility is granted by your management company. To be setup as the Board Invoice Approver for your association, please contact your management company about your permissions.